
PVC Electrical Conduit Installation Guide
This guide provides comprehensive instructions for installing PVC electrical conduit, adhering to industry best practices․ It covers key steps from planning and preparation to final connections․ The guide will delve into cutting, fitting, and securing the conduit to ensure a safe and code-compliant electrical system․
PVC electrical conduit is a widely used raceway system for protecting and routing electrical wiring․ It offers a cost-effective and durable solution for both residential and commercial applications․ Unlike metallic conduits, PVC is non-conductive, corrosion-resistant, and lightweight, making it easier to handle and install․ This introductory guide will explore the benefits, applications, and proper installation techniques for PVC electrical conduit systems․
PVC conduit protects electrical conductors from damage due to impact, moisture, and chemical exposure․ Its smooth interior surface facilitates easy wire pulling, reducing the risk of insulation damage․ The material’s resistance to corrosion makes it ideal for underground or outdoor installations where exposure to the elements is a concern․ Furthermore, PVC conduit is available in various sizes and configurations, allowing for flexible design and adaptation to different project requirements․
Understanding the properties and limitations of PVC conduit is crucial for ensuring a safe and reliable electrical installation․ This guide will provide the necessary information to properly select, install, and maintain PVC conduit systems, adhering to relevant electrical codes and standards․
Materials and Tools Required
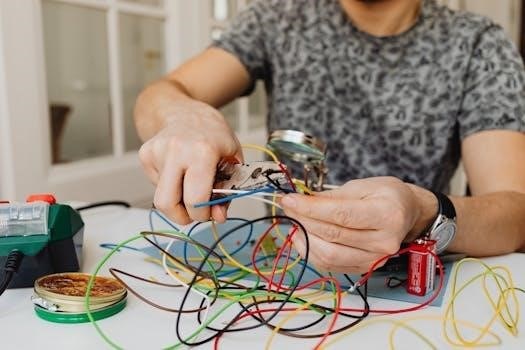
A successful PVC electrical conduit installation hinges on having the right materials and tools readily available․ Essential materials include PVC conduit pipes of the appropriate diameter and length, as determined by your project plan․ A variety of PVC fittings, such as couplings, elbows, and tees, are needed to create secure and watertight connections within the conduit system․ PVC cement, specifically formulated for electrical applications, is crucial for bonding the fittings to the conduit․
Several tools are necessary for cutting, preparing, and assembling the conduit․ A hacksaw or PVC cutter ensures clean and precise cuts․ A reaming tool is used to smooth the inside edges of the cut conduit, preventing damage to wires during pulling․ A measuring tape and marker are essential for accurate layout and marking of conduit runs․ Additionally, a level and conduit bender may be required for more complex installations․
Safety equipment, including safety glasses and gloves, is paramount to protect against debris and chemical exposure․ Having these materials and tools organized and accessible will streamline the installation process and contribute to a professional and safe outcome․
Planning and Preparation
Before commencing any physical work, careful planning is crucial․ Determine the conduit route, considering obstacles and accessibility․ Obtain necessary permits and inspect the work area for hazards․ Gather all required materials and tools for an efficient installation process․
Marking Conduit Placement
Accurate marking is paramount for a professional and code-compliant conduit installation․ Begin by consulting the electrical plans to understand the intended route of the conduit․ Utilize a measuring tape and level to precisely transfer these plans onto the installation surface, whether it’s a wall, ceiling, or underground trench․
Employ a pencil or marker to clearly indicate the path the conduit will follow․ Pay close attention to any bends or offsets required, marking their locations with precision․ Consider the spacing requirements for conduit supports, typically specified by electrical codes, and mark these points accordingly․ Ensure that the marked path avoids any existing obstructions, such as pipes, ducts, or structural elements․
Double-check all measurements and markings to minimize errors during the installation process․ Accurate markings not only contribute to a neat and organized installation but also ensure that the conduit system meets all safety and regulatory requirements․ This meticulous approach will save time and prevent costly rework later on․
Cutting and Preparing PVC Conduit
Proper cutting and preparation of PVC conduit are essential for creating secure and reliable connections․ This section covers selecting the right cutting tools, achieving clean cuts, and preparing the conduit ends for fittings, ensuring a professional and compliant installation․
Cutting Techniques
Achieving clean and precise cuts on PVC conduit is crucial for proper fitting and system integrity․ Several cutting techniques can be employed, each with its advantages․ A hacksaw with a fine-toothed blade offers control and precision, minimizing burrs․ A rotating pipe cutter provides a smooth, even cut, particularly useful for larger diameter conduits․ When using a saw, ensure a stable grip and apply even pressure to avoid splintering or cracking the PVC․ For a cleaner cut with a saw, consider using a miter box․
Always prioritize safety when operating cutting tools․ Wear appropriate eye protection to shield against flying debris․ After cutting, it is essential to remove any burrs or sharp edges from the cut end․ Using a utility knife or a deburring tool, carefully smooth the inner and outer edges of the conduit․ This step is crucial for preventing damage to wires when they are pulled through the conduit later, safeguarding the electrical system’s reliability․
Reaming the Conduit ID
Reaming the inner diameter (ID) of PVC conduit after cutting is an essential step to ensure smooth wire pulling and prevent insulation damage․ The cutting process often leaves burrs and sharp edges inside the conduit, which can snag or tear wires as they are drawn through․ Reaming removes these imperfections, creating a smooth, beveled edge․
A reaming tool, specifically designed for PVC conduit, is the ideal instrument for this task․ Insert the reaming tool into the conduit’s ID and rotate it firmly to shave off any burrs or irregularities․ Alternatively, a utility knife can be carefully used to achieve the same result․ Hold the blade at an angle and gently scrape away the rough edges․
Always exercise caution when using a utility knife to avoid accidental cuts․ The goal is to create a smooth, chamfered edge that will guide wires smoothly through the conduit, minimizing friction and the risk of damage․ Thorough reaming contributes significantly to the longevity and safety of the electrical installation․
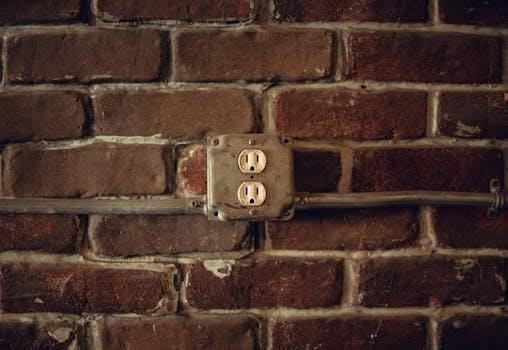
Installing Conduit Fittings
Installing conduit fittings is a crucial step in creating a complete and functional PVC conduit system․ Fittings provide connections between conduit sections, changes in direction, and terminations at junction boxes or equipment․ Proper installation ensures a secure, watertight, and electrically safe enclosure for wires․
Begin by selecting the appropriate fittings for the application, such as couplings, elbows, tees, and adapters․ Clean both the conduit end and the fitting socket to remove any dirt or debris․ Apply PVC cement evenly to both surfaces, following the manufacturer’s instructions for the correct amount and application technique․
Immediately insert the conduit into the fitting, twisting slightly to ensure even cement distribution․ Hold the connection firmly for a few seconds to allow the cement to set․ Remove any excess cement with a clean cloth․ Allow the cemented joint to cure completely before proceeding with the installation․ Secure fittings using appropriate mounting hardware, such as straps or clamps, to provide support and prevent movement․ Inspect all connections for leaks or gaps, and make any necessary repairs before energizing the system․
Mounting Conduit Supports
Properly mounting conduit supports is essential for maintaining the structural integrity and longevity of a PVC conduit system․ Supports prevent sagging, protect against physical damage, and ensure the conduit remains securely in place․ Selecting the right type and spacing of supports is crucial for optimal performance․
Various support options are available, including straps, clamps, hangers, and standoffs․ Choose supports that are compatible with the conduit size and material, and suitable for the installation environment․ Space supports according to code requirements and manufacturer recommendations, typically every three to five feet for horizontal runs and closer for vertical runs;
Secure supports to a stable surface, such as walls, ceilings, or framing members, using appropriate fasteners․ Ensure that supports are properly aligned and provide adequate clearance for the conduit․ Avoid over-tightening fasteners, which can damage the conduit or supports․ For exposed conduit runs, consider using supports with a UV-resistant finish to prevent degradation from sunlight; Regularly inspect supports for signs of wear or damage, and replace them as needed to maintain the system’s integrity․
Assembling the Conduit System
Assembling a PVC conduit system requires careful planning and execution to ensure a secure and reliable pathway for electrical wiring․ Start by dry-fitting all conduit sections and fittings to verify proper alignment and fit before applying PVC cement․ This step allows for adjustments and corrections before making permanent connections․
When applying PVC cement, follow the manufacturer’s instructions carefully․ Use a primer to clean and prepare the surfaces of both the conduit and fitting before applying the cement․ Apply a generous, even coat of cement to both surfaces and quickly insert the conduit into the fitting, twisting slightly to ensure full coverage․ Hold the joint firmly for several seconds until the cement sets․
Remove any excess cement from the joint to prevent it from hardening and obstructing the conduit․ Allow the cement to cure completely before subjecting the system to any stress or load․ Inspect all joints for leaks or gaps and re-cement if necessary․ Ensure that all conduit runs are properly supported and secured to prevent sagging or movement; Finally, cap the ends of the conduit runs to prevent debris or moisture from entering the system․
Wiring and Connections
Once the PVC conduit system is fully assembled and securely mounted, the next crucial step involves wiring and making the necessary electrical connections․ Before commencing any wiring work, ensure that the power supply to the circuit is completely shut off at the main breaker to prevent electrical shock․ Always use appropriate safety equipment, including insulated gloves and eye protection․
Begin by carefully pulling the electrical wires through the conduit system, using fish tape or a similar wire-pulling tool․ Ensure that the wires are not damaged or frayed during the pulling process․ Once the wires are in place, make the necessary connections at junction boxes, outlets, and other electrical devices․
Use wire connectors or terminals that are appropriate for the wire size and type․ Securely tighten all connections to prevent loose wires, which can cause electrical hazards․ Properly ground all electrical devices and equipment to ensure safety and prevent electrical shocks․ After completing the wiring and connections, carefully inspect all work to ensure that it is done correctly and in accordance with electrical codes․ Finally, test the circuit to verify that it is functioning properly before restoring power․
Safety Considerations
Prioritizing safety is paramount when working with electrical systems and installing PVC conduit․ Before commencing any work, always disconnect the power supply to the circuit at the main breaker to prevent electrical shock․ Wear appropriate personal protective equipment, including safety glasses, gloves, and sturdy footwear․ Inspect all tools and equipment for damage before use, and ensure they are in good working condition․
When cutting PVC conduit, use a sharp saw or cutter and avoid applying excessive force, which can cause the conduit to shatter․ When using solvent cement to join conduit fittings, work in a well-ventilated area to avoid inhaling harmful fumes․ Avoid working in wet or damp conditions, as water can increase the risk of electrical shock․
Be aware of your surroundings and avoid contact with overhead power lines or other electrical hazards․ If working at heights, use a ladder or scaffolding that is stable and properly secured․ If you are not comfortable or experienced working with electrical systems, it is best to hire a qualified electrician to perform the installation․ Always adhere to local electrical codes and regulations to ensure a safe and compliant installation․